


Table of contents
- Introduction
- 1. Overview of Command-Line Tools
- 2. Benefits of Building Command-Line Tools with Node.js
- 3. Setting Up a Node.js Development Environment
- 4. Creating a Basic Command-Line Tool
- 5. Parsing Command-Line Arguments
- 6. Handling User Input and Output
- 7. Building Interactive Command-Line Tools
- 8. Distributing and Sharing Command-Line Tools
- 9. Testing and Debugging Command-Line Tools
- 10. Best Practices for Command-Line Tool Development
- 11. Conclusion
- 12. Code
Introduction
Command-line tools are powerful utilities that allow developers and system administrators to interact with their computers through the command-line interface (CLI). These tools can automate tasks, streamline workflows, and improve productivity. In this article, we will explore how to create command-line tools using Node.js, a popular JavaScript runtime.
Note: All the Code for this is given at the end of the blog.
GitHub Repo: https://github.com/vishwasracharya/command_line_tools
1. Overview of Command-Line Tools
Command-line tools are software programs that are executed in a terminal or command prompt. They provide a text-based interface for users to interact with the computer system and perform various operations and tasks. Command-line tools are widely used in software development, system administration, and automation.
2. Benefits of Building Command-Line Tools with Node.js
Node.js is an excellent platform for building command-line tools due to its ease of use, extensive package ecosystem, and event-driven architecture. Here are some benefits of using Node.js for command-line tool development:
JavaScript: Node.js allows developers to write command-line tools using JavaScript, a widely adopted language with a large developer community.
NPM: Node Package Manager (NPM) provides a vast collection of open-source packages that can be easily integrated into command-line tools, saving development time and effort.
Asynchronous Programming: Node.js's event-driven, non-blocking I/O model enables developers to create efficient and responsive command-line tools.
Cross-Platform Compatibility: Node.js runs on various operating systems, making it easy to develop command-line tools that work consistently across different platforms.
Rapid Prototyping: Node.js's modular and lightweight nature allows developers to quickly prototype and iterate command-line tools.
3. Setting Up a Node.js Development Environment
Before we start creating command-line tools, we need to set up a Node.js development environment. Follow these steps:
Install Node.js: Download and install the latest version of Node.js from the official website.
Link to Download Node.js: https://nodejs.org/en/download
Verify the installation: Open a terminal or command prompt and run the command
node -v. If it displays the installed Node.js version, the installation was successful.
Install a code editor: Choose a code editor that suits your preferences. Some popular options include Visual Studio Code, Atom, and Sublime Text.

4. Creating a Basic Command-Line Tool
To create a basic command-line tool with Node.js, follow these steps:
Open your preferred code editor and create a new folder for your project.
Open a terminal or command prompt and navigate to the project folder.
Initialize a new Node.js project by running the command
npm init. Follow the prompts to set up the project.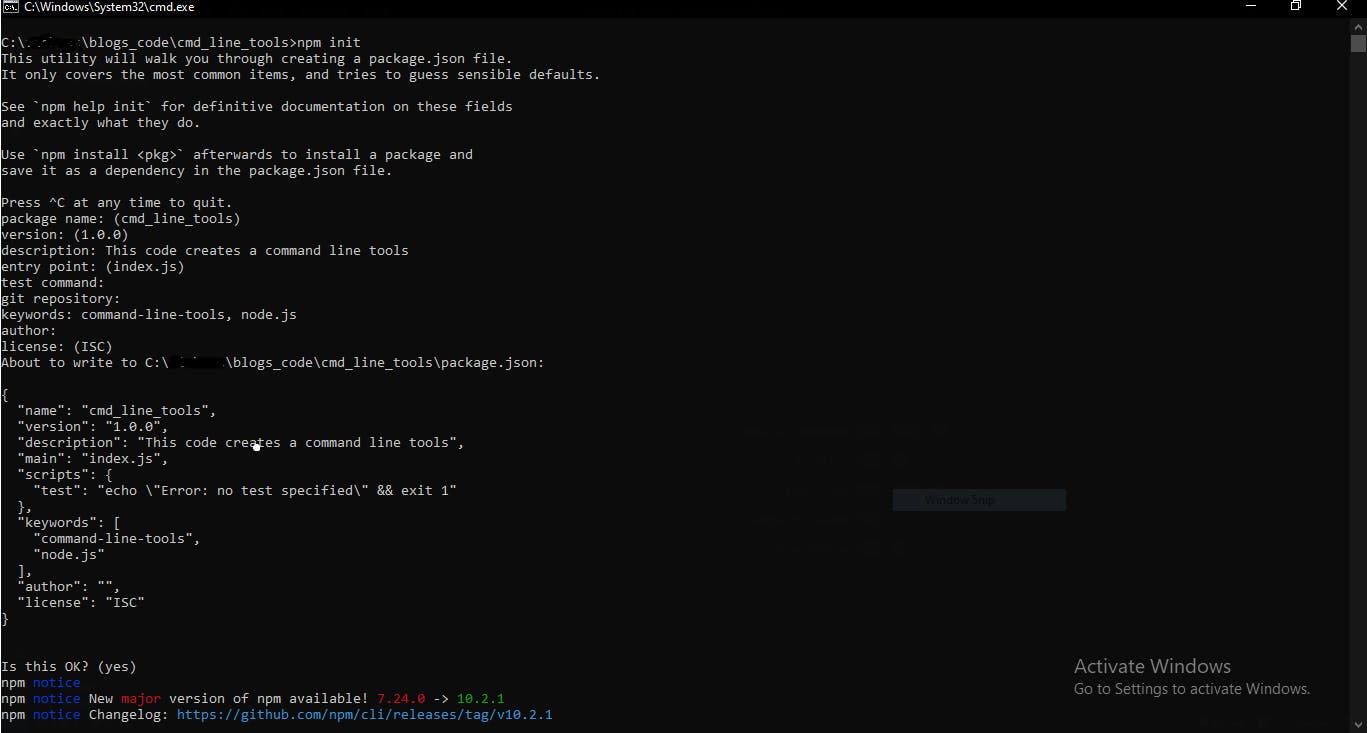
Create an entry point file, such as
index.js, where you will write the code for your command-line tool.Implement the desired functionality using JavaScript. You can leverage built-in Node.js modules or install third-party packages using NPM.
5. Parsing Command-Line Arguments
Command-line tools often require users to provide arguments to specify the desired behavior. Node.js provides several libraries for parsing command-line arguments effortlessly. One popular library is Commander, which simplifies argument parsing and validation.
To use Commander, follow these steps:
Install Commander by running the command
npm install commander.Import the Commander module in your Node.js script.
Define the command-line options and arguments using the Commander API.
Implement the desired functionality based on the parsed arguments.

6. Handling User Input and Output
Command-line tools interact with users through the terminal, so it's crucial to handle user input and display output effectively. Node.js provides the built-in Readline module, which simplifies reading user input and displaying output.
To use Readline, follow these steps:
Import the Readline module in your Node.js script.
Create an interface for reading input and output.
Handle user input using event listeners.
Display output using the
console.log()function.
7. Building Interactive Command-Line Tools
Interactive command-line tools enhance the user experience by providing a more engaging and intuitive interface. Node.js offers various libraries and techniques to build interactive command-line tools.
One popular library is Inquirer.js, which provides an interactive command-line prompt with various input types, validation, and customization options. To use Inquirer.js, install it by running the command npm install inquirer, and then follow its documentation to create interactive prompts.
8. Distributing and Sharing Command-Line Tools
Once you have developed a command-line tool using Node.js, you may want to distribute and share it with others. Here are some common methods for distributing command-line tools:
Publish on NPM: If your tool is generic and reusable, consider publishing it on NPM, allowing others to install it using a simple command.
Create an executable: Package your command-line tool as an executable file that users can run directly without needing to install Node.js or any dependencies.
Share the source code: Share the source code of your command-line tool through a version control system like GitHub, enabling others to clone and use it.
9. Testing and Debugging Command-Line Tools
Testing and debugging are crucial aspects of command-line tool development. Node.js provides several testing frameworks and debugging tools that can help ensure the quality and reliability of your tools.
For testing, you can use frameworks like Mocha or Jest to write automated tests that validate the functionality of your command-line tool.
For debugging, you can leverage the built-in Node.js Debugger or use external tools like Chrome DevTools or Visual Studio Code's Debugger to step through your code and identify issues.
10. Best Practices for Command-Line Tool Development
When developing command-line tools with Node.js, it's essential to follow best practices to ensure maintainability, reliability, and ease of use. Here are some best practices to consider:
Design a clear and intuitive command-line interface.
Provide meaningful error messages and usage instructions.
Use proper logging and error-handling mechanisms.
Modularize your code for reusability and testability.
Document your command-line tool using a README file.
Continuously update and maintain your tool to address bugs and improve functionality.
11. Conclusion
Creating command-line tools with Node.js can greatly enhance your productivity and streamline your workflows. By leveraging the power of JavaScript and the vast Node.js ecosystem, you can build robust, cross-platform tools that cater to your specific needs. Remember to follow best practices, test your tools thoroughly, and share them with others to make a positive impact in the developer community.
12. Code
First, make sure you have Node.js and npm installed. If not, you can download them from the official website: https://nodejs.org/
Create a new directory for your project and navigate to it in your terminal.
Initialize a new Node.js project and install the
commanderpackage:
npm init -y
npm install commander
- Create a JavaScript file (e.g.,
calculator.js) and add the following code:
#!/usr/bin/env node
const { Command } = require('commander');

const program = new Command();

program
  .version('1.0.0')
  .description('A simple calculator tool')
  .option('-a, --add <numbers>', 'Add numbers', add)
  .option('-s, --subtract <numbers>', 'Subtract numbers', subtract);

function add(numbers) {
  const numArray = numbers.split(',').map(Number);
  const result = numArray.reduce((acc, num) => acc + num, 0);
  console.log('Result:', result);
}

function subtract(numbers) {
  const numArray = numbers.split(',').map(Number);
  const result = numArray.reduce((acc, num) => acc - num);
  console.log('Result:', result);
}

program.parse(process.argv);
In this code, we define a simple CLI tool with two commands: add and subtract. It uses the commander package to parse command-line arguments and execute the corresponding functions.
- Make your script executable by changing the file permissions:
chmod +x calculator.js
- You can now use your CLI tool like this:
To perform addition:
./calculator.js -a 5,10,15To perform subtraction:
./calculator.js -s 20,5,3
This is a basic example, and you can expand it to include more functionality and error handling as needed for your specific use case.